
Geely Boyue Pro / Atlas Pro Carplay / APK / Android Auto

Step by step guide to install Carplay / APK / Android Auto on Geely Atlas Pro and Geely Boyue Pro
Activation of CarPlay and Android Auto for Geely Atlas Pro 2019-2023 on the standard radio - NaviPilot CarPlay for Geely Atlas Pro 2019-2023
Tools:
- Torx 8 screwdriver
- Wrench with a set of nozzles (for 10)
- Removable sheaths, plastic.
- USB-UART converter.
- Laptop.
- Flash drive with APK
Step 1.
We format the flash drive in FAT32 format, download the APK file to it (to the root).
we want to install, for example, ES or Autokit_9 (for carplay) LINK
APKs must support Android 4.4 and newer.
Step 2.
Download the Putty program. LINK
Step 3.
We download the driver for the USB - UART converter. But we install it.
Depends on the converter chip. For example, for converters with a CP2102 chip - LINK
The converter may look like this:

Step 4.
We proceed to the analysis of the car console.
We pull the overlay of the instrument panel towards us. We start from the bottom and go up a little. We take off

Step 5.
Lift the engine start button with a spatula, remove it.

Step 6.
We insert the spatula into the slot and remove the side cover from the side passenger

Step 7.
Unscrew the bolts.

Step 8.
We unclip the overlay, it is desirable to help ourselves with spatulas beforehand.

Step 9.
Unscrew the bolts holding the climate control unit. We pull it forward


Step 10.
Unscrew the bolts and use a spatula to install the decorative overlay.


Step 11.
If you have it in the package - disconnect the backlight.
Step 12.
We unscrew the bolts that hold the display. We remove it.

Step 13.
Unscrew the bolts and pull out the control unit. Yes, it will only come out a little, hold the cables.

Step 14.
Unscrew the top cover (Torch 8). We try not to
break the seals. We remove the upper metal cover.
Step 15.
We disconnect all the loops behind. The far right is responsible for USB in the car on the driver's side.
Step 16.
We take the UART controller. On the converter, we are looking for RXD and TXD, GND.

Step 17.
Connect the TX on the controller with the RX on the board with a Dupont cable (see the next step). RX on the controller with TX on the board, GND with GND.
Step 18.
Find this part of the board. Insert the GND pin from the controller to the GND on the board. Do not forget that on the board RX = TX on the controller

Step 19.
Insert the UART converter into the PC
Step 20.
Start the Putty program. Select “serial”, speed 921600, press enter. Note that the COM port must be selected depending on which USB port you insert the UART into. If you don't know how to see it in
device managers - just manually try from COM1 to COM5, simple
enter in the field.

Step 21.
After pressing enter, a black terminal will appear. Empty.
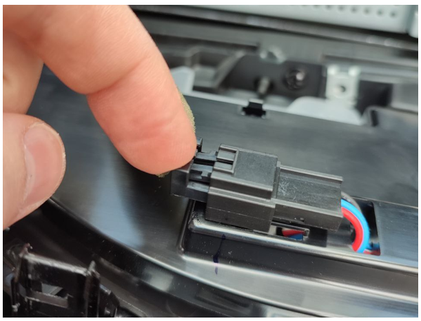
Step 22.
Insert the cable from our USB (blue) and, in principle, the screen cable
(pink) into the main device (before that we disconnected everything). On the left is a pad with
three loops, connect the lowest one (only it), this is the power wire
Step 23.
If everything is connected correctly, the drivers are downloaded, the speed is correct and so on then you will have an inscription in the terminal.

Step 24.
Enter manually (after 10-20 seconds, when the system boots)
pm install -r /mnt/media_rw/usbotg-otg1/PROGRAM NAME.apk
For example pm install -r /mnt/media_rw/usbotg-otg1/autikit_9.apk

Step 25.
If the flash drive is inserted, and there is an apk with this name in the root of the flash drive, then in 10 - 40 seconds the program will be installed and success will appear in the terminal
Step 26.
Install ES driver, Autokit and buy such an adapter. Google Carlinkit.

Step 28.
We collect everything back. Setting up your Carlinkit.
Resource: https://t.me/atlaspro_ua_group